
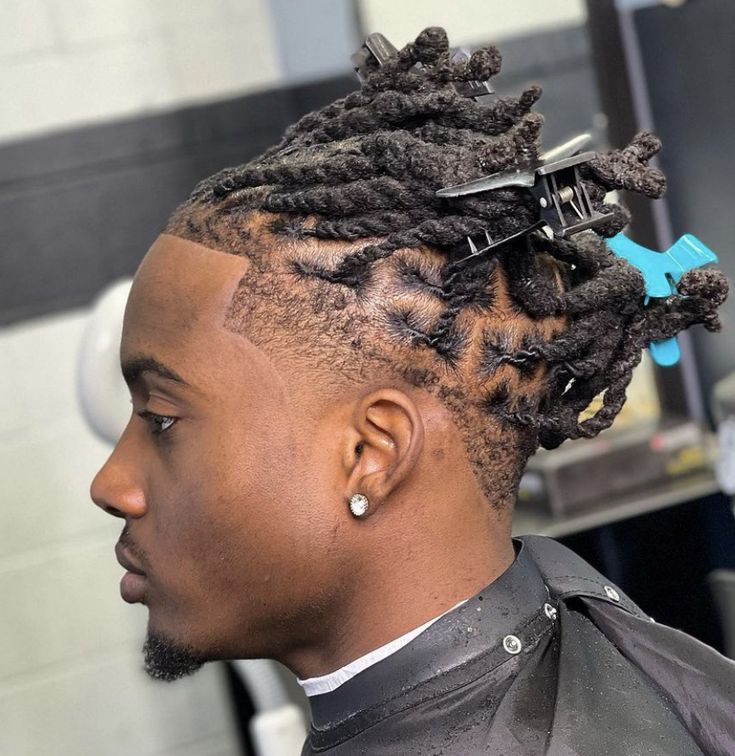
Combining the classic edginess of dreadlocks with the sharp, modern polish of a taper fade creates a bold and stylish hairstyle. However, achieving the perfect taper fade with dreadlocks can be a challenge.
Should you leave it to the hands of a professional, or can you successfully tackle this style transformation at home?
Let’s dive into the feasibility of DIY taper fade dreads, explore a step-by-step guide, and weigh the potential benefits and downsides of doing it yourself.
The Complexity of Taper Fade Dreads
Before embarking on this hair journey, it’s crucial to have a realistic understanding of the process:
- Fading Expertise: Creating a seamless taper fade requires skill and practice with hair clippers. Fading around dreadlocks adds an additional layer of complexity since you’ll need to maneuver carefully and visualize the fade through the locks.
- Dreadlock Maturity: Taper fades look best with well-established, mature dreadlocks that have some structure. Attempting this on loose hair or newly started dreads poses additional challenges.
- Hair Texture Considerations: Hair texture can influence the ease of achieving your desired fade level. Those with thicker or denser hair may find it more difficult to create a very short, smooth taper at home.
Essential Tools for DIY
Gather these tools for your at-home taper fade attempt:
- Hair Clippers: Invest in quality clippers with multiple guards for a gradual fade.
- Trimmers: For precise detailing around the hairline and neckline.
- Handheld Mirror (and Additional Mirror): To view the back and sides. Having two mirrors for multiple angles is essential.
- Combs: For parting and sectioning.
- Hair Ties: To secure sections of dreads.
- Neck Strip (Optional): To minimize loose hairs and clean up the edge.
Step-by-Step Guide: How to Attempt a Taper Fade with Dreads at Home
Now, let’s break down the process of creating your taper fade with dreads at home. Remember, patience and practice are key as you navigate this unique hair cutting technique.
Step 1: Start Clean
Wash and condition your dreadlocks thoroughly. Healthy, clean hair is easier to work with during styling. Ensure your locks are completely dry before beginning the fading process. Avoid cutting damp or wet dreadlocks.
Step 2: Visualize Your Fade
Determine your desired taper fade style. Do you envision a high, mid, or low taper? Decide how short you want the shortest point of the fade to be. If needed, use a washable barber’s pencil or eyeliner to lightly mark guide lines on your scalp to help visualize the transition of your fade.
Step 3: Section and Secure
Create manageable sections within your dreadlocks. Divide your hair based on your chosen fade style and use small hair ties to secure each separate section. This allows you to work methodically and isolate the areas you’ll fade, minimizing the risk of cutting the wrong dreads.
Step 4: Begin at the Bottom
Select a clipper guard that aligns with the length you want at the shortest point of your fade. Start at the neckline and carefully fade upwards, maneuvering the clippers around the base of your secured dreadlock sections. Move gradually to avoid uneven lines and work your way around the sides of your head.
Step 5: Transition with Guards
For a seamless taper fade, gradually transition to shorter clipper guards as you move upwards. This creates the signature blended look of a fade. The number of guards you’ll use depends on the total length you desire in contrast with the shortest starting point of your fade.
Step 6: Detail and Clean Up
Switch to hair trimmers to carefully clean up the hairline, around the ears, and the neckline. Remove any stray hairs and refine the edges of your fade for a well-groomed finish.
The Pros and Cons
Let’s consider the advantages and potential drawbacks of tackling this hairstyle at home:
Choosing between a DIY approach and utilizing a professional stylist is a significant decision. Let’s delve deeper into the potential advantages and disadvantages of creating a taper fade with dreadlocks at home:
Pros:
- Cost-Effective: The most obvious benefit is financial. DIY fades eliminate the cost of salon appointments, especially for regular fade maintenance and touch-ups, saving you money long-term.
- Convenience: When the urge to refresh your fade strikes, you won’t need to wait for an appointment. Style and touch up your taper fade dreads on your own schedule, whenever it suits you.
- Customization: You have full control over the outcome of your taper fade. Create the exact fade level, length contrast, and overall aesthetic that matches your unique vision.
Cons:
- Challenging Technique: Mastering clipper fades takes practice, and that learning curve is amplified when fading around the irregular shapes of dreadlocks. Perfecting an even blend and achieving a polished fade takes significant skill.
- Limited Visibility: Due to the nature of dreadlocks and the positioning of the fade, seeing the back of your head accurately is incredibly difficult. This can easily lead to uneven fade lines or unintentional asymmetrical results.
- Risk of Mistakes: Mistakes made on loose hair can be easily corrected with clippers. However, if you accidentally cut your dreads too short or create a notably uneven fade, camouflaging it is far more complex.
When Consulting a Professional is Best
Choosing a professional loctician or barber with experience in fading and dreadlocks is often the wisest decision, especially if:
- You’re a Beginner: If you lack experience with clippers and fades, starting with a professional ensures a strong foundation for your taper fade dreads.
- You Desire Perfection: Pros understand the nuances of tapering around dreadlocks and can achieve a flawless fade.
- This is Your First Time: Having the initial taper fade done professionally provides a template you can maintain with careful touch-ups at home.
Tips for Successful DIY Taper Fade Dreads
Opting for the DIY approach means taking control of your unique style. Follow these tips to increase your chances of a successful transformation at home:
Start Conservatively
Especially for your early attempts, it’s wiser to start with a higher taper fade line. This allows room for minor imperfections and gives you more leeway as you work. You can always go shorter and create more contrast in subsequent touch-up sessions as your confidence grows.
Good Lighting
Optimal visibility is crucial when managing a complex cut like a taper fade with dreads. Choose a well-lit area or set up additional lamps to ensure that you clearly see every section of your head for an even fade.
Take Breaks
Avoid rushing through your taper fade! Set aside ample time and work at a steady, careful pace. Take breaks to stretch, refocus, and step away from the mirror. Returning with fresh eyes helps you spot any unevenness and adjust accordingly.
Get a Helping Hand
While fading the front and sides of your own head is possible, seeing the back is incredibly difficult. If possible, enlist a friend or family member to help with the back sections. Even if they don’t actively cut, a second pair of eyes offering feedback on your progress is invaluable.
Maintenance for Your DIY
Maintaining your DIY taper fade with dreads requires a few key practices:
- Regular Touch-Ups: Touch up the fade every couple of weeks to keep the lines crisp, especially as new hair growth appears.
- Dreadlock Care: Maintain healthy dreadlocks with proper washing, conditioning, and moisturizing routines.
- Protective Styling: Minimize stress on your fade by utilizing protective styles that keep your dreads up and away from the neckline, especially when sleeping.
Embracing the Imperfections of DIY
Remember, DIY haircuts rarely achieve the same level of technical perfection as professional work. Even a slightly uneven fade can still look incredibly cool paired with dreadlocks, adding an element of raw individuality to your style. However, be prepared for a potential learning curve as you refine your technique.
Is a DIY Taper Fade With Dreads Right for You?
The decision to DIY your taper fade with dreadlocks depends on your skill level, comfort with hair clippers, and expectations. If you enjoy the challenge, crave the customization of at-home styling, and embrace a slightly less polished aesthetic, then this DIY journey might be perfect for you.
Alternatively, if precision is your priority or you’re new to fades and dreadlocks, seeking the expertise of a professional will provide the most polished and guaranteed results.
The Choice is Yours
Styling hair is a form of self-expression, and your journey towards a taper fade with dreads is no different. Whether you opt for the DIY approach or choose the precision of a professional, own your style with confidence. Your unique look is bound to turn heads, regardless of who’s behind the clippers.